Blogger template and blogger related, game for blog, and more for blog....
read more | digg story
Friday, June 13, 2008
Tuesday, June 10, 2008
How to hide blogger toolbar
How to hide you blog tool bar..
and check preview and save template
- login your blog
- Goto layout> edit html
| #navbar-iframe { height:0px; visibility:hidden; display:none } |
and check preview and save template
Add your blog or site in search engines
Submitting your blog or site to search engines is an important way for visitors to find your blog. Here are 8 search engines that you can manually submit to.
How to add your blog to Google Sitemap
Google Sitemaps is a tool that lets you notify Google every time you update your blog so that they return to index it. Will Google sitemaps help increase your ranking? The answer is yes!
How do you add your blog to Google Sitemaps?
First, you'll need a Google account. Once you have a Google account login to "Google Webmaster Tools."
https://www.google.com/webmasters/sitemaps/login?hl=us&utm_campaign=sitemaps-us-pbtls&utm_source=EM
In the "Add Site box," enter the URL to your blog, and hit ok.
You will then be asked to verify your site. You should receive a message that says, "Your site has been added to your account. Verify your ownership to view detailed statistics and errors for it."
Follow the next steps and verify your site.
Google offers two methods of verification. You might want to choose the Meta tag option.
You will then be given a META Tag. Copy the META tag listed and paste it in the section of your blog, before the first section.
Once you've added the Meta tag to your template, click on the verify button. If you have placed it in the wrong section the system will tell you.
Once you've verified your blog, it will take you to summary. Part of the display will include:
Potential indexing problems:
Some of your pages are partially indexed. [?]
We do not know about all the pages of your site. Submit a Sitemap to tell us more about your site.
Select the link “Submit a Sitemap.”
This will take you to Add Sitemap.
You can create a sitemap at http://www.xml-sitemaps.com/
The only drawback to using xml-sitemaps.com is that you will need to update your sitemap if you add a lot of pages to your blog, therefore you might want to submit your site feed url.
In the "Choose type pull down list", select "Add General Web Sitemap."
You'll then see a box that says, " My Sitemap URL is:"
Into the box for Sitemap URL, paste your Site Feed URL or the location of where you've uploaded the sitemap that you created and click "Add Web Sitemap."
Tip: If your blog is hosted on your own domain then upload the map to the "public_html/" folder of your site.
That's it, you're done. Now every time you add new content to your blog simply take the following URL and add your sitemap URL to the end of it: Ex: www.google.com/webmasters/sitemaps/ping?sitemap= http://sitemap_url
You’ll need to encode the url to the path of your sitemap when pinging Google. This URL Encoder tool http://www.automapit.com/urlencoder.html will help you convert your URL to the proper format.
To see if Google has cached your blog, simply type cache: http://yourblogaddress into Google search.
How to Embed a YouTube Video on Your Blog
How to Embed a YouTube Video on Your Blogger Blog
To embed your You Tube video into Blogger follow the following steps:
To embed your You Tube video into Blogger follow the following steps:
- Select your YouTube video.
- Copy the code from the box at the line that says embed. You will find the box directly to the right of the video.
- Log into Blogger and create a new post.
- Click on the edit HTML tab
- Paste the code into the post.
- Save your post.
How to add your blog to Facebook
Log into Facebook and click Posted Items in the left-hand sidebar. If you don't see it click on more. You will then see a page titled 'My Friends' Posted Items." On the right it will say "Post a link." Paste your blog url in and press the “Post” button. You can then customize your link.
Monday, June 9, 2008
How to add a playlist to your Blog
Upload the MP3 files to a free host. Next create a text file in notepad that includes the full path to the files you want to include.
EX:
http://www.FREHOST.com/download/1.mp3
http://www.the_host_name.com/download/2.mp3 http://www.FREHOST.com.com/download/3.mp3 http://www.FREHOST.com/download/4.mp3
Code:
EX:
http://www.FREHOST.com/download/1.mp3
http://www.the_host_name.com/download/2.mp3 http://www.FREHOST.com.com/download/3.mp3 http://www.FREHOST.com/download/4.mp3
- Save the file as .m3u. ex: Playlist.m3u
- Upload the m3u file to a free host.
- Copy the url address.
- Replace Url_of_Your_Audio_File with the path to the .m3u.
Code:
| <embed src="Url_of_Your_Audio_File" autostart=false loop=false height=62 width=144 controls="console"></embed> |
Saturday, June 7, 2008
Take control of any Windows PC on the Internet with CrossLoop
TechRepublic Article here
Takeaway: Whether it is for troubleshooting or collaboration, sometimes you just need to see what is on a user's screen to really know what is going on. The free software utility CrossLoop makes connecting any two personal computers as easy as typing a phone number and clicking Connect.
For more images of CrossLoop in action, check out the TechRepublic image gallery: here
Under certain circumstances, connecting two personal computers over the Internet can get more complicated than many are willing to accept. Tools like Microsoft's Remote Assistance can be intimidating to the novice user and frustrating for the experienced user trying to gain access. Adding hurdles such as firewalls and routers to the mix means that many just give up on the whole idea of remote assistance.
Similar complaints are often heard about collaboration software. While the concept of two-heads-are-better-than-one is applicable to many situations in the business world, getting those two heads together presents challenges beyond just the personalities involved. There are several collaboration applications available; some are expensive and some are part of the operating system, but very few are as easy to implement as they should be.
However, one tool I have come across seems to have found the answer with a simple interface and an ease of operation that will make many other vendors of such software envious. CrossLoop connects any two personal computers running Windows with a deceptively simple interface that is essentially a box with an access number and a connect button. CrossLoop works through firewalls and routers without any additional configuration and encrypts all of the information flowing back and forth between the machines. The simplicity of setting up CrossLoop and getting two computers connected is remarkable when compared to the hoops most of us have to jump through to get the same result with other applications.
CrossLoop
The CrossLoop software can be downloaded from the TechRepublic Software Library. The 1.6-MB installation file is an executable file, so starting the installation process is as simple as double-clicking.
Making Windows XP Start 60% Faster
Whenever you start your computer, you are faced with a few moments of thumb twiddling while Windows XP boots and prompts you to log on. Although you should expect to wait for a few moments, sometimes Windows XP seems to boot rather slowly. In fact, you may notice that over a period of time the PC that used to roar to life seems a bit sluggish instead. Fortunately, you can perform several techniques that help Windows XP get the bootup speed you want. This chapter explores how to put these techniques to work.

Troubleshooting Windows XP
When Windows works properly, it's relatively easy to ignore; you can concentrate on the work you're trying to do and forget about the plumbing inside your computer. But when something goes wrong, it often requires an experienced guide to solve the problem and restore the computer to working condition. Everybody who uses Microsoft Windows eventually has to deal with cryptic error messages, frozen screens, and other more or less dramatic problems. Windows troubleshooting is the set of tools and techniques that can identify the source of a problem and find a solution.
It's Never Done That Before is a guide to Windows XP troubleshooting for people who don't spend their lives fixing computer problems. It includes basic troubleshooting techniques, specific instructions for solving the most common problems in Windows XP, and more general information for finding and fixing more obscure ones. It also provides pointers to explanations of BIOS beep codes and blue screen errors, instructions for using the troubleshooting tools supplied with Windows XP such as Safe Mode and the Recovery Console, and advice for dealing with device drivers, the ROM BIOS, and the Windows Registry. Viruses, spyware, and Internet connection problems are all included, along with advice for getting the most out of the Microsoft Knowledge base and other online information resources, and dealing with help desks and technical support centers.
From the Back Cover
Do some Windows XP problems make you scratch your head in wonder? Has an application suddenly chosen not to start or a piece of hardware simply stopped working? Ever had the Internet "disappear" or been faced with a Blue or Black Screen of Death? Do the neighbors call you to fix their machines when you’d really prefer to hand them a book so they can solve their own problems?
If you know enough about computers to use one but not always enough to fix those unexpected Windows problems, It’s Never Done That Before! is the book for you. It gives you:
• Troubleshooting techniques and tips for solving common XP problems
• Strategies for finding and fixing obscure It’s Never Done That Before! Problems
• Hints for troubleshooting BIOS beep codes and Blue Screen errors
• Help with XP’s troubleshooting tools (such as Safe Mode and the Recovery Console)
• Survival strategies for wrangling device drivers, the BIOS, and the Windows Registry
• Techniques for dealing with viruses, spyware, and Internet problems
• Advice for getting the most out of the Microsoft Knowledge Base and other online resources, plus tips for dealing with technical support
Got Windows problems? You’re not alone. Reach for It’s Never Done That Before!—the lifeline you’ll grab when your computer does something you didn’t expect it to do.
- 264 pages
- Publisher: No Starch Press (May 19, 2006)
- ISBN-10: 1593270763
- ISBN-13: 978-1593270766
Make your computer dual-boot Vista and XP
Make your computer dual-boot Vista and XP
Make your computer dual-boot Vista and XP
It's getting harder to buy a new computer with Windows XP installed and — after Microsoft stops selling XP on June 30, 2008 — it will become nearly impossible.
Fortunately, you can have your XP cake and eat your Vista, too, by setting up your system to boot between the two operating systems.
Add an XP option to your new Vista system
If a new computer arrived in your recent past, or you plan to buy one in the near future, chances are it will come with Windows Vista installed. Although some manufacturers still give you the option of getting XP on your new system, that option is likely to dry up for most consumers later this year when Microsoft stops selling Windows XP.
If you're not ready to dive into Vista all at once, there is an answer: set up your Vista computer to dual-boot between Vista and XP.
In this article, I'll tell you how to make your PC give you a choice between Vista and XP every time you start up. In a separate article coming soon, I'll give you some additional tips that save disk space on a dual-boot system.
Although some sources, such as Computer Shopper Magazine, advise that you need an add-on product like VistaBootPro to dual-boot, you can accomplish the same thing without any additional software other than the two operating systems.
Before starting, make sure you have your Windows XP install discs ready as well as your Windows Vista DVD. In addition, it's a good idea to make a complete system backup before beginning an operation like this.
Once you've laid that groundwork, you're ready to go to work:
Step 1. In Vista, click Start, type diskmgmt.msc, and press Enter. Click Continue if prompted by User Account Control.
Step 2. Right-click a drive and choose Shrink Volume. Specify the amount to shrink, which in this case is the amount you want for your XP partition. At a minimum, you'll need around 2.5GB for XP Pro SP2. I suggest you select a larger partition to leave room for updates and other files that may need to be on the same drive as XP. Because I wanted a 5GB partition, I typed 5000 (representing 5,000 megabytes) in the available box. Click Shrink.
Step 3. Right-click the newly available area and choose New Simple Volume. Follow the steps in the wizard to assign a drive letter now, or wait until the next step. When prompted, check Perform a quick format to format the volume with NTFS.
Step 4. When the wizard is done formatting the new volume, you can assign or rearrange drive letters as needed. For example, changing drive letters may also put your CD/DVD drive in a more logical order.
To do that, right-click a volume or the CD/DVD drive and choose Change Drive Letters and Paths. If a volume hasn't got a drive letter yet, click Add. Otherwise, select the drive icon in the dialog box and click Change.
If you're rearranging the letters on existing drives, you may need to change the drives in a particular order. Or you may need to give a drive a temporary letter (such as Z) to free up a letter for another drive; you would change the Z drive to something else later. Make your selection and click OK. Repeat for other partitions or drives until you have the order you want.
Step 5. When you're done with your partitioning chores, exit Disk Management. Insert your XP disc into the drive and restart your system, booting from that disk.
Step 6. Follow the steps to install XP. When asked for the target drive, select your new partition and press Enter. Because you already formatted this partition with NTFS, you can skip the formatting step. At the appropriate screen, arrow down to Leave the current file system intact (no changes) and press Enter. Continue the installation process until it's finished and XP has started.
Step 7. Your system now boots to XP, so we'll need to do some fixing to set up a boot menu. Insert your Vista DVD and restart the computer from it. Click Next in the first screen.
Step 8. Don't click Install when prompted! Instead, click Repair Your Computer in the lower-left corner.
Step 9. When the System Recovery Options dialog appears, make sure Microsoft Windows Vista is selected and click Next. In the next dialog box, select the Command Prompt option at the bottom.
Step 10. In the command-prompt window, type the following commands and press Enter after each one:
bootrec.exe /fixMBR
bootrec.exe /fixBoot
Step 11. Close the command prompt and click Restart.
Step 12. When your computer has booted into Vista, click Start, type cmd.exe, and press Ctrl+Shift+Enter to make the command window open with elevated privileges. Click Continue, if prompted by User Account Control.
Step 13. Type the following commands in the command window, one at at time, pressing Enter after each one. After each command, you should get the response, "The operation completed successfully." A response of, "The specified entry already exists," is OK, too. If not, retype your command to make sure you've entered it correctly. If Vista is installed on a drive other than c:, change the first command below to use the proper drive letter. The curly braces around {ntldr} in each command must be typed exactly as shown:
bcdedit -set {ntldr} device partition=C:
bcdedit -set {ntldr} path \ntldr
bcdedit -displayorder {ntldr} -addlast
bcdedit -set {ntldr} description "Microsoft Windows XP"
That's it! The next time you restart your system, you should be see a prompt that will let you choose between Vista or XP. Select the one you want and press Enter.
How to customize your boot menu
When you start your dual-boot system, the menu will appear for a few seconds. If you don't press any keys, eventually Windows Vista will start. Fortunately, you can change this if you don't want Vista to be your default operating system. You can also customize the waiting period before the default kicks in.
Here's what to do:
Step 1. Click Start. Type systempropertiesadvanced and press Enter. Click Continue, if prompted by User Account Control.
Step 2. Under Startup and Recovery, click Settings.
Step 3. At the top of the dialog box, select the operating system you want to start by default.
Step 4. In the box to the right of Time to display list of operating systems, specify the number of seconds for the options to stay on screen. Click OK.
Microsoft provides documentation of Vista's bcdedit command and its parameters in an article in the Windows Vista Technical Library.
Having two operating systems on the same computer definitely takes a little extra disk space. In a future column, I'll show you some ways to make the two operating systems share some common resources to save on storage.
Google Backdoor Download Tutorial
Google Backdoor Download Tutorial
Looking for that elusive MP3/DvDRip/Xvid/Gamez/appz?
Try this little trick which makes use of Googles’ superior power in web searches. This trick is capable to penetrate (it’s not hacking; I use it just to search for servers where people store their mp3s) the servers in such way that we can download the contents in them.
This download tutorial is meant only for Google as it is never been tested using other search engines.
First Way
Copy this set of string and search thru Google.
"parent directory " /appz/ -xxx -html -htm -php -shtml -opendivx -md5 -md5sums
"parent directory " DVDRip -xxx -html -htm -php -shtml -opendivx -md5 -md5sums
"parent directory " Xvid -xxx -html -htm -php -shtml -opendivx -md5 -md5sums
"parent directory " Gamez -xxx -html -htm -php -shtml -opendivx -md5 -md5sums
"parent directory " MP3 -xxx -html -htm -php -shtml -opendivx -md5 -md5sums
"parent directory " artist/songtitle/album -xxx -html -htm –php -shtml -opendivx -md5 -md5sums
Add the item you want to search for after the word “parent directory” and before –xxx. Theoretically, you can add it anywhere in the string as long as you don’t add the minus (-) sign. The sign is meant the tell Google to exclude any searches that are related to the minused term.
Example:
--------------------------------------------------------------
"parent directory " MP3 Sugar Ray-xxx -html -htm -php -shtml -opendivx -md5 -md5sums
--------------------------------------------------------------
Second Way:
Copy and paste this string in the Google search.
intitle:index.of "mp3" +"artists/songtitle/album " -htm -html -php -asp "Last Modified"
Its so easy. Just change the artists/songtitle/album into the one you want.
Example:
-----------------------------------------------
intitle:index.of "mp3" +"placebo" -htm -html -php -asp "Last Modified"
-----------------------------------------------
Third Way:
Copy and paste this string in the Google search.
intitle:”index of” ”last modified” ”parent directory” (wmv|mp3) artist/album
Its so easy. Just change the artists/songtitle/album into the one you want.
Example:
-----------------------------------------------
intitle:”index of” ”last modified” ”parent directory” (wmv|mp3) placebo
---------------------------------------------------------------------------
Or you can visit...... h**p://www.tyoogle.com/ and type what your looking for in the search box.
Example. Typing Kylie Mp3 will open up a google page of liks to MP3's
---------------------------------------------------------------------------
Or Head on over to h**p://johnny.ihackstuff.com/ghdb.php to give you some other ideas.
---------------------------------------------------------------------------
Or just give Googlehack a go h**p://code.google.com/p/googlehacks/
Shutting Down Xp In Different Ways
There are so many different ways to turn off your Windows XP computer, let's look at some of them:
- The standard approach - click the Start Button with your mouse, then select the Turn Off menu and finally click the Turn Off icon on the Turn Off computer dialog. blink.gif
- Press Ctrl+Esc key or the Win key and press u two times - the fastest approach.
- Get the Shutdown utility from Download.com - it add the shut down shortcuts for you. Else create them yourself using approach
- Create a shutdown shortcut on your desktop. Right click on the desktop, choose New Shortcut and type shutdown -s -t 00 in the area where you are asked to specify the location of the program file. Now you can just double click this icon to turn off the computer. The best location would be your quick launch bar.
- Press the Win key + R key to open the run window. Type shutdown -s -t 00. [s means shutdown while t means the duration after which you want to initiate the shutdown process].
If some open processes or application won't let you turn off, append a -f switch to force a shut down by closing all active processes. - Win+M to minimize all windows and then Alt+F4 to bring the Turn Off computer dialog.
- Open Windows Task manager (by right clicking the Windows Task bar or Alt+Ctrl+Del) and choose Shut down from the menu. Useful when the Windows are not responding.
- open task manager--->click on shutdown--->hold the ctrl key and click on Turn off::::::: pc will be turned off in 3 secs.. fastest method other than hard shutdown
Connecting two Lans in Different Locations
Connecting 2 Lans in Different Locations
Let’s say you are currently operating an office of 10~50 users, running Windows Server 2000/2003, mainly to share printers and files. You need to open a new office or add new location to work from. You want to create a WAN or VPN so that the users can still access files on the server. Your current Internet setup is ADSL Modem, to a Router, to a switch. Server connects to the Switch and the rest of the office connects to a switch also. Also, another possibility is to say you just want to connect your Home to your Network at work. Or even two different networks in your building.
What you basically want is a network like the attached Image below. Set up each site as its own network but using different private address ranges. If you have a different private addressing scheme in place at the main site (eg 192.168.2.xxx or something) then keeping that is fine, just make sure that the one you use at the new site doesn't overlap. When you connect the two sites, they'll just see each other as one big network, so in that diagram below the people in the new site will be able to ping 192.168.1.2 and just get to the right machine at the old site. Everyone will be on the same gateway as programmed into each router
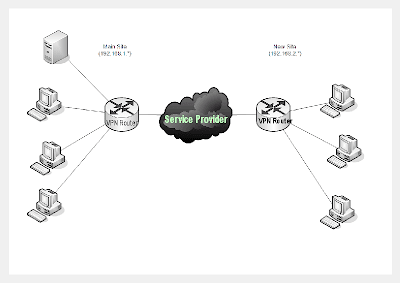
There are two basic options for how you connect the two sites.
The first is to run a private link between them. Typically this would be something like ISDN, frame relay or Ethernet, depending on distance, speed requirement and how much money you have to throw at it. This is generally the more expensive option, although it's also the most reliable.
The other is to give each site a decent (cable/ADSL) Internet connection and set up a VPN pass-through. By configuring the VPN on the two routers, the machines at each end have no idea what's in the middle; they just see the other site as a network which is reachable through the router. This is generally cheaper, but you're relying on your ISP for performance. If you do this, pay particular attention to the upload speeds your ISP offers, because the transfer speed between the sites will be kept to the slower of the sending site's upload and the receiving site's download. Normal ADSL is capable of up to 1.5 Mbps uploads, but many ISPs throttle it to far less.
For the VPN method, some of the higher-end consumer gear can set up a VPN tunnel over an Internet connection. For the direct link, you'll be looking at a proper Cisco router or similar brand. Although, Cisco now owns Linksys and their BEFSX41 router will also work just fine.(See *-Note)
The important thing I don't want to forget to mention is that you need to look for in the specs is the ability for the router to maintain a VPN connection by itself. Just about every consumer router will support 'VPN pass-through', which is just letting the PCs behind the router do VPN stuff, but only some will maintain the VPN tunnel themselves.
The other thing you'll need at each end is a static IP address on the Internet connection -- dynamic DNS and IPsec VPNs generally don't mix.
*-Note! The BEFSX41 Linksys Instant Broadband™ EtherFast® Cable/DSL Firewall Router with 4-Port Switch/VPN Endpoint is the perfect solution for connecting a small group of PCs to a high-speed broadband Internet connection or a 10/100 Ethernet backbone. The Router can be configured to limit internal users’ Internet access based on URLs and/or time periods - URL filtering and time filtering. For enhanced protection against intruders from the Internet, the Router features an advanced Stateful Packet Inspection firewall. Use the Cable/DSL Firewall Router with 4-Port Switch/VPN Endpoint to create IPSec VPN tunnels, so you can securely connect to the corporate server from your home office—or any location when you’re on the road. The Router provides a dedicated port for DMZ hosting and acts as the only externally recognized Internet gateway on your local area network (LAN). With the performance and security features of the Cable/DSL Firewall Router with 4-Port Switch/VPN Endpoint, your network will take advantage of the Internet while keeping its data secure.
Another Option is a WRVS4400N Wireless-N Gigabit Security Router with VPN, Secure, high-speed wireless networking for growing businesses or gaming family.
• Wireless-N offers greater speed and coverage than Wireless-G, while at the same time being backwards compatible with 802.11b and g devices
• SPI Firewall, and Intrusion Prevention secure the work from outside threats
• QuickVPN IPSec VPN tunnel support provides secure remote user connectivity
• Support for WMM provides improved QoS over wireless connections for better video and voice performance
The WRV200 Wireless-G VPN Router with RangeBooster, Secure, smart wireless networking for growing Businesses.
• RangeBooster (MIMO) technology for dramatically increased range
• SPI Firewall, Encryption, and VPN support makes your network secure
• Multiple BSSIDs and VLANs provide separate secure networks
• Enhanced QoS for both Wireless and wired provide improved quality voice/video
Change the product key on Windows XP
For most Microsoft Windows XP installs, you’ll never need to worry about the validity of the product key assigned to your copy of the OS. However, software does tend to get installed without authorization, even in the most carefully managed shops, and so from time to time you may need to reset the Windows XP product key.
For example, perhaps a user installed a pirated copy of XP but now wants to go legal. Maybe you’ve been hired by an organization that installed 100 pirated copies of XP but now has a legitimate volume-licensing key (VLK). Perhaps an end user purchased an additional retail license for XP but needs to use his original CD to install the software. When situations like these arise, changing XP’s product key is often the most practical-or only-solution.
Determining if you have a valid product ID
Hopefully you already know if you’re dealing with a pirated copy of XP. But if you’re unsure, a quick way to tell is to install Service Pack 1. Shortly after releasing Windows XP, Microsoft realized that most pirated XP installations were using two specific VLKs, the most popular of which begins with “FCKGW.” These VLKs produce product IDs that match either XXXXX-640-0000356-23XXX or XXXXX-640-2001765-23XXX, where X is any number.
If you try to install SP1 and get the following error message:
The Product Key used to install Windows is invalid. Please contact your system administrator or retailer immediately to obtain a valid Product Key…”
You are dealing with a pirated copy of Windows. For more information about obtaining a valid product key, see Microsoft Knowledge Base article 326904.
You can also directly check the operating system’s product ID by right-clicking on My Computer, clicking Properties, and selecting the General tab. The machine’s product ID will be located under the Registered To section. If the ID matches either of the two models commonly associated with VLK fraud, you’ll need to obtain a valid XP product key before proceeding. None of the procedures described below will work without a legitimate product key.
Two methods of changing Windows XP’s product key
You can change a Windows XP installation’s product key either by editing the registry or by using one of two Windows Management Instrumentation (WMI) scripts. The registry editing method is outlined in Knowledge Base articles 321636 and 328874 and works on Windows XP Home, Windows XP Professional, and Windows XP Corporate Edition.
The script method is outlined in article 328874 and is designed to work on Corporate Edition installations that use a VLK and do not require activation. It may work on a Home or Professional installation, but I have not tested this scenario.
The script method is the practical solution for changing the product keys on a large number of machines. Regardless of the method you choose, make sure to backup important data before changing a product ID, since an unexpected problem could render the machine unbootable and necessitate a complete reinstallation of Windows.
Warning
The following instructions involve editing your system registry. Using the Windows Registry Editor incorrectly can cause serious problems that require the reinstallation of your operating system and possible loss of data. TechRepublic does not support problems that arise from editing your registry. Use the Registry Editor and the following directions at your own risk.
Editing the registry
Begin by opening the Registry Editor and navigating to
HKEY_LOCAL_MACHINESoftwareMicrosoftWindowsNTCurren t VersionWPAEvents In the right pane, right-click the ODBETimer binary value and select Modify. Change at least one character of this value to either a number from 0 to 9 or to a letter from A to F, then click OK and close the Registry Editor. This renders the current product key invalid and deactivates Windows.
Now, it’s time to reactivate Windows using your new product key. Click Start | Run and enter the command:
%systemroot%system32oobemsoobe /a where %systemroot% is your Windows directory. In many cases, this command will look like:
C:windowssystem32oobemsoobe.exe /a At this point, Windows will launch the Product Activation Wizard.
 Product Activation Wizard
Select the option to telephone a Microsoft customer service representative to activate Windows, as shown in Figure A, and click Next. Now, select the Change Product Key option and enter your new product key as shown in Figure B. Finally, click Update and close the window. If Windows returns you to the previous screen, just select the Remind Me Later option. When the wizard is finished, reboot the system.
Figure B
Enter new product key
When Windows reboots, your next step will depend on which Windows XP version you are using. If you have XP Home or Professional, you’ll be prompted to reactivate your copy of Windows through the normal activation process. If you have XP Corporate, no activation is required and your machine should have a valid product ID. You can verify this by running the %systemroot%\system32\oobe\msoobe.exe /a command again. When the wizard loads this time, you should see a message indicating that your copy of Windows has already been activated.
Using a WMI script
Although the registry editing process is effective, it can be tedious and impractical if you need to change the product key on more than a few machines. So Microsoft provides two WMI scripts, one for XP machines with SP1 and one for XP machines without SP1.
For example, if you wanted to change the product key on an XP machine without SP1 and had already saved the script to root directory on the C: drive, you would click Start | Run and enter the following command:
C:changevlkey2600.vbs xxxxx-xxxxx-xxxxx-xxxxx-xxxxx Of course, xxxxx-xxxxx-xxxxx-xxxxx-xxxxx in this scenario is a valid product key.
The script should take only a few seconds to run and won’t prompt you for further action unless there’s a problem, such as an invalid product key. As with the registry editing method, you can verify that Windows is now using a valid product key by running the command:
%systemroot%system32oobemsoobe.exe /a The Product Activation Wizard will load and should tell you that your copy of Windows has already been activated. More
For example, perhaps a user installed a pirated copy of XP but now wants to go legal. Maybe you’ve been hired by an organization that installed 100 pirated copies of XP but now has a legitimate volume-licensing key (VLK). Perhaps an end user purchased an additional retail license for XP but needs to use his original CD to install the software. When situations like these arise, changing XP’s product key is often the most practical-or only-solution.
Determining if you have a valid product ID
Hopefully you already know if you’re dealing with a pirated copy of XP. But if you’re unsure, a quick way to tell is to install Service Pack 1. Shortly after releasing Windows XP, Microsoft realized that most pirated XP installations were using two specific VLKs, the most popular of which begins with “FCKGW.” These VLKs produce product IDs that match either XXXXX-640-0000356-23XXX or XXXXX-640-2001765-23XXX, where X is any number.
If you try to install SP1 and get the following error message:
The Product Key used to install Windows is invalid. Please contact your system administrator or retailer immediately to obtain a valid Product Key…”
You are dealing with a pirated copy of Windows. For more information about obtaining a valid product key, see Microsoft Knowledge Base article 326904.
You can also directly check the operating system’s product ID by right-clicking on My Computer, clicking Properties, and selecting the General tab. The machine’s product ID will be located under the Registered To section. If the ID matches either of the two models commonly associated with VLK fraud, you’ll need to obtain a valid XP product key before proceeding. None of the procedures described below will work without a legitimate product key.
Two methods of changing Windows XP’s product key
You can change a Windows XP installation’s product key either by editing the registry or by using one of two Windows Management Instrumentation (WMI) scripts. The registry editing method is outlined in Knowledge Base articles 321636 and 328874 and works on Windows XP Home, Windows XP Professional, and Windows XP Corporate Edition.
The script method is outlined in article 328874 and is designed to work on Corporate Edition installations that use a VLK and do not require activation. It may work on a Home or Professional installation, but I have not tested this scenario.
The script method is the practical solution for changing the product keys on a large number of machines. Regardless of the method you choose, make sure to backup important data before changing a product ID, since an unexpected problem could render the machine unbootable and necessitate a complete reinstallation of Windows.
Warning
The following instructions involve editing your system registry. Using the Windows Registry Editor incorrectly can cause serious problems that require the reinstallation of your operating system and possible loss of data. TechRepublic does not support problems that arise from editing your registry. Use the Registry Editor and the following directions at your own risk.
Editing the registry
Begin by opening the Registry Editor and navigating to
HKEY_LOCAL_MACHINESoftwareMicrosoftWindowsNTCurren t VersionWPAEvents In the right pane, right-click the ODBETimer binary value and select Modify. Change at least one character of this value to either a number from 0 to 9 or to a letter from A to F, then click OK and close the Registry Editor. This renders the current product key invalid and deactivates Windows.
Now, it’s time to reactivate Windows using your new product key. Click Start | Run and enter the command:
%systemroot%system32oobemsoobe /a where %systemroot% is your Windows directory. In many cases, this command will look like:
C:windowssystem32oobemsoobe.exe /a At this point, Windows will launch the Product Activation Wizard.
 Product Activation Wizard
Select the option to telephone a Microsoft customer service representative to activate Windows, as shown in Figure A, and click Next. Now, select the Change Product Key option and enter your new product key as shown in Figure B. Finally, click Update and close the window. If Windows returns you to the previous screen, just select the Remind Me Later option. When the wizard is finished, reboot the system.
Figure B

Enter new product key
When Windows reboots, your next step will depend on which Windows XP version you are using. If you have XP Home or Professional, you’ll be prompted to reactivate your copy of Windows through the normal activation process. If you have XP Corporate, no activation is required and your machine should have a valid product ID. You can verify this by running the %systemroot%\system32\oobe\msoobe.exe /a command again. When the wizard loads this time, you should see a message indicating that your copy of Windows has already been activated.
Using a WMI script
Although the registry editing process is effective, it can be tedious and impractical if you need to change the product key on more than a few machines. So Microsoft provides two WMI scripts, one for XP machines with SP1 and one for XP machines without SP1.
- View the code for the WMI script, ChangeVLKey2600.vbs, designed for use on XP machines without SP1.
- View the code for the WMI script, ChangeVLKeySP1.vbs, for XP machines with SP1 already installed.
For example, if you wanted to change the product key on an XP machine without SP1 and had already saved the script to root directory on the C: drive, you would click Start | Run and enter the following command:
C:changevlkey2600.vbs xxxxx-xxxxx-xxxxx-xxxxx-xxxxx Of course, xxxxx-xxxxx-xxxxx-xxxxx-xxxxx in this scenario is a valid product key.
The script should take only a few seconds to run and won’t prompt you for further action unless there’s a problem, such as an invalid product key. As with the registry editing method, you can verify that Windows is now using a valid product key by running the command:
%systemroot%system32oobemsoobe.exe /a The Product Activation Wizard will load and should tell you that your copy of Windows has already been activated. More
101 Hidden Tips & Secrets For Photoshop
101 Hidden Tips & Secrets For Photoshop
- Press Tab will hide tool bar and palette, Shift+Tab will hide only palette.
- Hold Shift + click the top blue bar for toolbar and palette will move them to the nearest edge.
- Double click the top blue bar, on any palette window, to minimize it.
- Double click the gray background will bring up open file option, Hold Shift+double click will open up the browser.
- Sick of the default gray background around your image? Select paint bucket, hold shift and click on the gray background, it will change to whatever color you have in your foreground color box.
- 6. In Photoshop, all "Cancel" buttons in a window can be changed to a "Reset" button by holding Alt.
- Caps lock will switch your cursor for accuracy.
- Press F button, it will switch between 3 different screen modes and give you more working area.
- To draw a straight line, click then move to the end point and hold shift + click.
- Hold Ctrl will temporary make any tool into move tool until you release Ctrl.
- Ctrl + Alt and click drag the image, it will make a duplication of the current image over lay on top.
- Hold Space bar, it will make any tool into "Hand Tool" until you release Space bar.
- While in Zoom Tool, Ctrl+space = zoom in, alt+space = zoom out.
- Hold Ctrl and press "+" or "-" it will change the % for image in navigator window.
- When Using eyedropper tool to capture foreground color, hold Alt and click, it will instantly capture the color for background.
- With Measure Tool, draw a line then hold Alt and draw another line from the end of the first line, it will measure the angle.
- Ctrl+Alt+Z and Ctrl+Shift+Z will go back and forth in the history.
- Alt+Backspace and Ctrl+Backspace will fill in the whole screen with foreground color or background color, Shift+backspace will bring up option window, Alt+Shift+Backspace and Ctrl+Shift+Backspace, will fill the image with foreground or background color but will leave the alpha transparent area alone.
- When free transforming with Ctrl+T, hold Alt to keep the original image and then to transform a duplicated layer of it. Ctrl+Shift+T to repeat whatever you did in the last transform.
- To make sure your Crop is on the edge of the image, hold Ctrl while cropping.
- Ctrl+J will duplicate the current layer.
- Ctrl+Shift+E will merge all visible layers to one layer, Ctrl+Shift+Alt+E will make a copy of the original and merge all visible layers.
- While using Marquee Tools, hold Alt it will make the starting point as a center of the selection.
- Ctrl + D to deselect, Ctrl+Shift+D to reselect what you deselected.
- While selecting with Marquee tool, pressing the space bar can allow you to move the selection.
- Hold Shift and press "+" or "-" it will switch between the layer mode:
N = Normal
I = Dissolve
M = Multiply
S = Screen
O = Overlay
F = Soft Light
H = Hard Light
D = Color Dodge
B = Color Burn
K = Darken
G = Lighten
E = Difference
X = Exclusion
U = Hue
T = Saturation
C = Color
Y = Luminosity
Q = Behind 1
L = Threshold 2
R = Clear 3
W = Shadow 4
V = Midtones 4
Z = Highlights 4
***The shortcut works even for following situation:
***Alpha turned off, Indexed Mode, Line tool, Bucket Tools, Dodge and Burn Tool - While using Brush or any other tools, change the opacity by typing the number.
*** type one number for % of it's ten times [4=40%]
***type two number for exact % [press 7 then 2 will get 72%] - Hold Alt while clicking on the eye icon beside the layer, it will hide all other layers.
- Hold Alt while clicking the pen icon beside the layer, it will unchain this layer from all layers.
- Select a layer, hold Alt and click the top edge of another layer, it will group them.
- Hold Alt and click the button "Create a new layer", it will create a new adjustment layer.
- Select a layer and hold Alt, then click on the garbage can button. It will instantly delete the layer, marquee where you want alpha and Ctrl+click the "Create new channel" button, it will create an alpha only on the area you marquee.
- File> Automate > Contact Sheet: this can create a small thumbnail for every file, this can save you some time from searching.
- When Move Tool is selected, toolbox on top can be useful from time to time, these are "Auto select layer" and "Show bounding box".
- While Move Tool is selected, hold Shift (Alt+Shift+Right click) and allow whether or not to make a current layer chain with your upper layer.
- With grid on, click the top left corner of the grid and drag to anywhere on the image to set the pivot, double clicking on the icon again reset the pivot.
- After, draw a path on the image with pen tool, Ctrl+shift+H can hide/show it.
- Control Navigator with keyboard sometimes can be more time efficient than mouse.
***
Home = move to top left corner
End = move to right bottom corner
PageUp = move up one page
PageDown = move down one page
Ctrl+PageUp = move left one page
Ctrl+PageDown = move right one page
Shift+PageUp = move up 10 pixel
Shift+PageDown = move down 10 pixel
Ctrl+Shift+PageUp = move left 10 pixel
Ctrl+Shift+PageDown = move right 10 pixel - Ctrl+Tab allows you to switch between different image files you are working on.
- F12 = Revert to how the file was the last time you saved it.
- Shortcuts for Channel: RGB, CMYK, indexed color...
***
Ctrl+"~" = RGB
Ctrl+1 = red
Ctrl+2 = green
Ctrl+3 = blue
Ctrl+4 = other path
Ctrl+9 = other path
Ctrl+"~" = CMYK
Ctrl+1 = light green
Ctrl+2 = pink red
Ctrl+3 = yellow
Ctrl+4 = black
Ctrl+5 = other path
Ctrl+9 = other path
Ctrl+1 = Indexed
Ctrl+2 = other path
Ctrl+9 = other path - hold Ctrl then you can draw a red box in the Navigator thumbnail for viewing.
- Hold Alt and click on any of the history steps, that step will be copied and become the most recent one.
- Alt drag a step from a serial action can copy it to another action.
- Alt-click the flare preview thumb, and you can fill in numerical co-ordinates for lens flare.
- Holding Shift + Alt while transforming an object will do it proportionally, from the center.
- If you have the move tool selected and you want something duplicated just hold the alt key and move the image, holding the Shift + Alt while doing this, it will move it along one axis.
- If you want to straighten an image that is crooked (maybe from scanning), click on the eyedropper tool or hit the I key 3 times to get the ruler. Click on the left side of the straight edge, then the right side of the straight (but crooked) edge. The choose Image> Rotate Canvas> Arbitrary, Photoshop will give you the degrees of rotation you just click ok.
- If you create something in Illustrator, copy and paste it in Photoshop, it will ask you if you want this to be a pixel, path, or shape layer.
- If you have a mask on a layer and you want to place a image in there and keep the mask. Simply open the image, say copy, and then Ctrl click on the layer to select the mask and use Shift + Ctrl + V to paste it into the mask which will also put it on a new layer as well.
- To center an image, Ctrl + A , Ctrl + X, Ctrl + V, I think it also puts that image on a new layer.
- Ctrl+E will merge the highlighted layer down to the next
- When you have a brush selected, using [ or ] will scroll up or down that brush list.
- Double clicking the zoom tool will make the image 100%, double clicking the hand tool will fit the image to your screen resolution.
- Typing Content:
Ctrl + H will hide the highlight on your selected type.
If you click once while your type is selected on the font list, you can use your arrows to scroll up and down and see the fonts change on the fly!
Alt + Left or Right arrows will change your tracking in increments of 10
Ctrl + Alt + Left or Right arrows will change your tracking in increments of 100
Ctrl + Alt + Up or Down arrows will change your leading in increments of 10 pts
Shift + Ctrl with <> will change your font size in increments of 2 pts - Ctrl + Alt + T to make a copy of the layer in which you want to transform.
- Ctrl + Alt + Right arrow. duplicates the layer you are on.
- Change the active layer : Alt + [ or ].
- Move the active layer up and down : Ctrl + [ or ].
- Link 2 layers: with move tool click in the first layer hold Shift and click in the second one.
- Ctrl+[plus key] will let you zoom in on an image anytime while Ctrl+[minus key] zooms out. Ctrl+Alt+[plus key] will zoom in AND RESIZE the window to fit the image size... same for Ctrl+Alt+[minus key] as well.
- When using the Polygonal Lasso Tool, click backspace to undo a lasso step.
- Pressing X will switch the selected foreground and background colors.
- Pressing D will reset the foreground and backgrounds colors to black and white.
- If your image has multiple layers, create a Marquee selection and press Ctrl+Shift+Cit won't work if you selected a hidden layer) will copy the image into memory as if they were flattened! Paste it on a new document to see the result.
- Ctrl+Alt+Z will do multiple undo, versus just one.
- Ctrl+click a layer thumbnail to select the layer transparency
- To see what your layer mask looks like (and edit it), Alt+click its thumbnail in the layers palette
- Press and hold Ctrl+Alt and click the Help bar with your mouse, drag it down and highlight "About Photoshop" and let go of the left mouse button for a different About Photoshop splash/screen.
- When using Polygon lasso tool hold Shift to make a perfect line, it goes every 30 degrees
- Photoshop CS2: Group many layers by clicking the layers you want to group by clicking it while holding the Shift key down, and then press Ctrl+G to group them into a folder for means of better organization.
- Ctrl+Shift+N creates a new layer with a dialog box; Ctrl+Shift+Alt+N gets you a new layer without the hassle.
- Back to brush, [ and ] will increase/decrease your brush size, Shift + [ or ] will soften or harden your brush edge.
- Still in [ and ], Ctrl + [ or ] will move your currently selected layer up and down the hierarchy and Shift + [ or ] will select upper layer or lower layer.
- Stamp Tool (s) is used to copy an area of image (defined by alt+clicking and area) and paint it somewhere else (cloning). It also works when you have multiple images open at the same time. Alt click an area of any opened file image and paint it anywhere else.
- After you created a text you can click on font type tab and tap "down" key over and over to scroll through the font list and see the changes in (relatively) real time. A feature that I am tired of waiting to happen in illustrator.
- Still in text mode, a trick from Microsoft word to apply hi-light to your text hit Ctrl+Shift+ <> to resize your text, to your preferred font size. Pressing Ctrl key while you are typing also gives you a free transform box temporarily and will go if you release it. Resizing text also works by pressing Ctrl+T (on selected layer, not when you are typing). It still retains as an editable text layer after.
- And remember, pressing enter when you type will take you to a new line just like typing a letter but pressing Ctrl+Enter or Enter on numeric key will finish what you type.
- You can drag a layer on to any other opened images in Photoshop and it will copy it as a layer (better than copy and paste image). Holding down Shift while moving it will snap the image right on the center of the other opened image
- If you are working with sets....
Click on the set, in the blending mode it shows pass through by default... if you have an adjustment layer within a set and you want that adjustment layer to effect those layers underneath it within the set only, set the blending mode of the set to "normal" instead.
CODE
Mentioned before with more explanation:
- Pressed F to switch to 3 different viewing mode... when I first try it I said "wtf? what it's for?" Well, if you are sick of painting your image on the corners just to find yourself resizing your current image window, with F you can pan way outside your image. Happy corner painting!!
- Create a new file, 500x500 px, create a new layer, get a standard brush and paint a dot on the top center of your image (like the number 12 position on a clock). Press Ctrl+Alt+T, it will duplicate your original layer and free transform the new one. Move the pivot point (the circle with little dot in it found when you are free transforming something) to the center of your image, rotate your image 30 degrees to the right and hit OK to confirm the transform
now.........
Be excited..........
Hit Ctrl+Shift+Alt+T 10 times and see what happens! - When using the "move tool" you can select any layer by holding down the CTL key(CMD on a Mac) and clicking on the part of the layer on the canvas with your mouse. This way you won't have to go to the Layers palette every time and you don't have to keep checking on or off the auto select options for the move tool.
- You can link up layers without going into the layers palette, by selecting the layer (how I just mentioned above) and holding down CTL + Shift(CMD + badwordbadwordbadwordbadword on a Mac) for each additional layer you want to link up. You can unlink them by clicking on the layer again.
- You can delete more than one layer at a time.......by linking up all the layer you want to delete, and holding down CTL(CMD on a Mac) while you click on the garbage icon to delete the layer.
- When using the type tool you can ok it by pressing CTL + Enter(CMD + Enter on a Mac) instead of clicking on the check mark on the options.
- If you have more than one type layer, and want to make any of the following changes color/font/size/alignment/initializing to all of the type layers at the same time.....All you have to do is link up the type layer, hold down the Shift key and in the options for the type tool make your change i.e. color, size, etc.
- You can use your number pad to change opacity for a layer.... I.e. type 5 and the opacity will be 50; type 55 and the opacity will be 55. You can use the number pad for any tool that uses opacity...like the airbrush tool, stamp tool, brush, gradient, etc.
- Pressing Tab key will hide the Tools palette and any other palette that you have on the stage. Pressing "F" will change between Full Screen modes. Using these two tips you can view your work Full Screen without any palettes.(You can press CTL+Alt+0 to fit your work to the screen, or you can press CTL+0 to zoom to 100%)
- Pressing the "+" and "-" keys while holding down CTL+Alt will resize the whole document window, not just the work area.
- You can delete a layer by holding down the "Alt" key and pressing "L" twice......actually now with Photoshop 7 you got to press "L" three times. It's not actually a keyboard shortcut, but it's a quick way to do it....don't know if it works on a MAC.
- Pan documents with the space bar.
- Ctrl+click a layer (in layers palette) to select it's transparency.
- Ctrl+Alt+click between 2 layers in the palette to group them.
- Alt + click in “add layer mask” button to add a black layer mask (instead of a white one).
- When you select something, pressing Ctrl+J will copy the selected area and add another layer with the copied area - opposing copying the layer, making a new layer, and pasting it.
- To glue the palettes together (all palettes combined into one strip), you just drag & drop a palette onto the end of another palette (watch the rectangle that indicates where the palette will get attached to).
- Hold down Alt while Burning to Dodge instead, and vice versa.
- Ctrl-click a layer to select an objects; alternatively, you may select more than one object/s in more than 1 layer by holding Shift while using the method just mentioned (Ctrl-click). To deselect, just press Ctrl+D.
- If you have a mini scroll on your mouse, you may use that to zoom in (scroll up) or zoom out (scroll down).
- Need to locate a layer quick? Use the Move Tool (V) and right click on the area the object lays. There should now be a “cursor-menu” with all the layers that is in that particular area. Now take a good guess and see which one of them fits the shoe; select a layer and Ctrl-Click the layer in the Layer Palette - see if the selection traces the object you desired to edit/find. Useful for those messy people (i.e. me!).
- Need to get rid of a background quick? Assuming you at least know how to crop around an object, do so. Now press Ctrl+I or Shift+Ctrl+I for Inverse Selection. Press Ctrl+X to %@#!* that part out, and you should be left with the object!
- Want to save the time from loading All your Photoshop brushes, when your Photoshop accidentally forgets to load them up (happens to me sometimes)? Select the brush tool, and click the little arrow pointing right (located at the top toolbar), next to the Master Diameter tick. Go down to Preset Manager and now there should be a menu of all the brushes currently loaded. Click on the first brush (top left) and scroll down to the bottom. Now hold Shift and click the last brush (bottom right). This should highlight all the brushes. See the “Save Set” to the right in the menu? Click that and name your brush set whatever you want, for this matter I just name it All (so I remember that this brush set contains all the brushes I currently have loaded, and is located near the top when loading the brushes up).
Task Manager has been disabled
Task Manager has been disabled by your administrator Solved !
The problem is whenever you try to open Task Manager, the following error may occur:
This error is caused if the DisableTaskMgr restriction is enabled.
Solution:
To enable Task Manager, try one of these methods:
Method 1
Click Start, Run and type this command exactly as given below [Just copy and paste] :
REG add HKCU\Software\Microsoft\Windows\CurrentVersion\Pol icies\System /v DisableTaskMgr /t REG_DWORD /d 0 /f
Just copy the following code into notepad and save the file asEnableTM.reg and double click on it.
Windows Registry Editor Version 5.00
[HKEY_CURRENT_USER\Software\Microsoft\Windows\Curre ntVersion\Policies\System]
“DisableTaskMgr”=dword:00000000
Method 3 (try only if u r good with registry editing)
The problem is whenever you try to open Task Manager, the following error may occur:
“Task Manager has been disabled by your administrator”
Cause:This error is caused if the DisableTaskMgr restriction is enabled.
Solution:
To enable Task Manager, try one of these methods:
Method 1
Click Start, Run and type this command exactly as given below [Just copy and paste] :
REG add HKCU\Software\Microsoft\Windows\CurrentVersion\Pol icies\System /v DisableTaskMgr /t REG_DWORD /d 0 /f
Just copy the following code into notepad and save the file asEnableTM.reg and double click on it.
Windows Registry Editor Version 5.00
[HKEY_CURRENT_USER\Software\Microsoft\Windows\Curre ntVersion\Policies\System]
“DisableTaskMgr”=dword:00000000
Method 3 (try only if u r good with registry editing)
- Click Start, Run and type Regedit.exe
- Navigate to the following branch:
- In the right-pane, delete the value named DisableTaskMgr
- Close Regedit.exe
- Click Start, Run, type gpedit.msc and click OK.
- Navigate to this branch:
- Double-click the Remove Task Manager option.
- Set the policy to Not Configured.
Rename Your PC PENTIUM Name
Rename Your PC PENTIUM Name and Make it Personalized
(This requires using Regedit to Modify)
If you Hold Down your Key and Hit Key,
Your will see a similar Screen
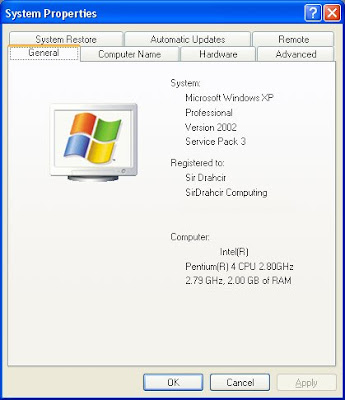 This is how to change the Registry Hardware Name of your CPU
If you are not comfortable with using "Regedit" Stop Reading Now and go have a beer.
GO TO START>RUN>TYPE REGEDIT
>HKEY_LOCAL_MACHINE>HARDWARE>DISCRIPTION>SYSTEM>CE NTRAL
PROCESSOR>ProcessorNameString>
Select the Processor by Number, Hint, the 1st Processor is Number 0
Then Navigate to and dbl clk to bring it up and you can create a Custom Name String for your CPU
Close Regedit
I changed mine to read
Intel(R) Pentium(R) 4 SirD 2.79GHz
The Change is immediate and Now it reads like this:
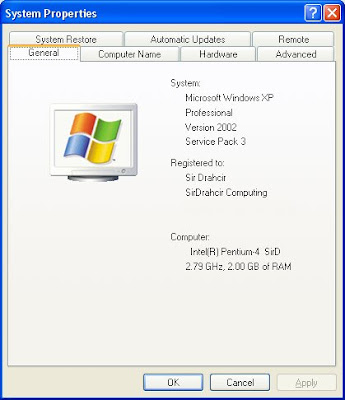
Just another way to waste a little time and personalize your equipment in case of theft
(This requires using Regedit to Modify)
If you Hold Down your
Your will see a similar Screen
This is how to change the Registry Hardware Name of your CPUIf you are not comfortable with using "Regedit" Stop Reading Now and go have a beer.
GO TO START>RUN>TYPE REGEDIT
>HKEY_LOCAL_MACHINE>HARDWARE>DISCRIPTION>SYSTEM>CE NTRAL
PROCESSOR>ProcessorNameString>
Select the Processor by Number, Hint, the 1st Processor is Number 0
Then Navigate to
Close Regedit
I changed mine to read
Intel(R) Pentium(R) 4 SirD 2.79GHz
The Change is immediate and Now it reads like this:
Just another way to waste a little time and personalize your equipment in case of theft
Windows Xp Hidden Applications
To run any of these apps go to Start > Run and type the executable name, for example: charmap
WINDOWS XP HIDDEN APPLICATIONS:
WINDOWS XP HIDDEN APPLICATIONS:
- Character Map = charmap.exe (very useful for finding unusual characters)
- Disk Cleanup = cleanmgr.exe
- Clipboard Viewer = clipbrd.exe (views contents of Windows clipboard)
- Dr Watson = drwtsn32.exe (Troubleshooting tool)
- DirectX diagnosis = dxdiag.exe (Diagnose & test DirectX, video & sound cards)
- Private character editor = eudcedit.exe (allows creation or modification of characters)
- IExpress Wizard = iexpress.exe (Create self-extracting / self-installing package)
- Mcft Synchronization Manager = mobsync.exe (appears to allow synchronization of files on the network for when working offline. Apparently undocumented).
- Windows Media Player 5.1 = mplay32.exe (Retro version of Media Player, very basic).
- ODBC Data Source Administrator = odbcad32.exe (something to do with databases)
- Object Packager = packager.exe (to do with packaging objects for insertion in files, appears to have comprehensive help files).
- System Monitor = perfmon.exe (very useful, highly configurable tool, tells you everything you ever wanted to know about any aspect of PC performance, for uber-geeks only )
- Program Manager = progman.exe (Legacy Windows 3.x desktop shell).
- Remote Access phone book = rasphone.exe (documentation is virtually non-existant).
- Registry Editor = regedt32.exe [also regedit.exe] (for hacking the Windows Registry).
- Network shared folder wizard = shrpubw.exe (creates shared folders on network).
- File siganture verification tool = sigverif.exe
- Volume Contro = sndvol32.exe (I've included this for those people that lose it from the System Notification area).
- System Configuration Editor = sysedit.exe (modify System.ini & Win.ini just like in Win98! ).
- Syskey = syskey.exe (Secures XP Account database - use with care, it's virtually undocumented but it appears to encrypt all passwords, I'm not sure of the full implications).
- Mcft Telnet Client = telnet.exe
- Driver Verifier Manager = verifier.exe (seems to be a utility for monitoring the actions of drivers, might be useful for people having driver problems. Undocumented).
- Windows for Workgroups Chat = winchat.exe (appears to be an old NT utility to allow chat sessions over a LAN, help files available).
- System configuration = msconfig.exe (can use to control starup programs)
- gpedit.msc used to manage group policies, and permissionsr
Friday, June 6, 2008
NOTEPAD "world trade centre trick"
NOTEPAD "world trade centre trick"..
Did you know that the flight number of the plane that had hit WTC ...on
9/11 was Q33N ....
Open your Notepad in ur computer and type the flight number i.e Q33N... Increase the Font Size to 72, Change the Font to Wingdings. U will be amazed by the findings.
Thursday, June 5, 2008
Make Your PC Experience Easy With Shortcuts
Run Commands:
Run Commands to access the control panel:
Command Prompt:
Windows Explorer Shortcuts:
- compmgmt.msc - Computer management
- devmgmt.msc - Device manager
- diskmgmt.msc - Disk management
- dfrg.msc - Disk defrag
- eventvwr.msc - Event viewer
- fsmgmt.msc - Shared folders
- gpedit.msc - Group policies
- lusrmgr.msc - Local users and groups
- perfmon.msc - Performance monitor
- rsop.msc - Resultant set of policies
- secpol.msc - Local security settings
- services.msc - Various Services
- msconfig - System Configuration Utility
- regedit - Registry Editor
- msinfo32 - System Information
- sysedit - System Edit
- win.ini - windows loading information (also system.ini)
- winver - Shows current version of windows
- mailto: - Opens default email client
- command - Opens command prompt (also cmd)
Run Commands to access the control panel:
- Add/Remove Programs control - appwiz.cpl
- Date/Time Properties control - timedate.cpl
- Display Properties control - desk.cpl
- FindFast control - findfast.cpl
- Fonts Folder control - fonts
- Internet Properties control - inetcpl.cpl
- Keyboard Properties control - main.cpl keyboard
- Mouse Properties control - main.cpl
- Multimedia Properties control - mmsys.cpl
- Network Properties control - netcpl.cpl
- Password Properties control - password.cpl
- Printers Folder control - printers
- Sound Properties control - mmsys.cpl sounds
- System Properties control - sysdm.cpl
Command Prompt:
- ANSI.SYS Defines functions that change display graphics, control cursor movement, and reassign keys.
- APPEND Causes MS-DOS to look in other directories when editing a file or running a command.
- ARP Displays, adds, and removes arp information from network devices.
- ASSIGN Assign a drive letter to an alternate letter.
- ASSOC View the file associations.
- AT Schedule a time to execute commands or programs.
- ATMADM Lists connections and addresses seen by Windows ATM call manager.
- ATTRIB Display and change file attributes.
- BATCH Recovery console command that executes a series of commands in a file.
- BOOTCFG Recovery console command that allows a user to view, modify, and rebuild the boot.ini
- BREAK Enable / disable CTRL + C feature.
- CACLS View and modify file ACL's.
- CALL Calls a batch file from another batch file.
- CD Changes directories.
- CHCP Supplement the International keyboard and character set information.
- CHDIR Changes directories.
- CHKDSK Check the hard disk drive running FAT for errors.
- CHKNTFS Check the hard disk drive running NTFS for errors.
- CHOICE Specify a listing of multiple options within a batch file.
- CLS Clears the screen.
- CMD Opens the command interpreter.
- COLOR Easily change the foreground and background color of the MS-DOS window.
- COMP Compares files.
- COMPACT Compresses and uncompress files.
- CONTROL Open control panel icons from the MS-DOS prompt.
- CONVERT Convert FAT to NTFS.
- COPY Copy one or more files to an alternate location.
- CTTY Change the computers input/output devices.
- DATE View or change the systems date.
- DEBUG Debug utility to create assembly programs to modify hardware settings.
- DEFRAG Re-arrange the hard disk drive to help with loading programs.
- DEL Deletes one or more files.
- DELETE Recovery console command that deletes a file.
- DELTREE Deletes one or more files and/or directories.
- DIR List the contents of one or more directory.
- DISABLE Recovery console command that disables Windows system services or drivers.
- DISKCOMP Compare a disk with another disk.
- DISKCOPY Copy the contents of one disk and place them on another disk.
- DOSKEY Command to view and execute commands that have been run in the past.
- DOSSHELL A GUI to help with early MS-DOS users.
- DRIVPARM Enables overwrite of original device drivers.
- ECHO Displays messages and enables and disables echo.
- EDIT View and edit files.
- EDLIN View and edit files.
- EMM386 Load extended Memory Manager.
- ENABLE Recovery console command to enable a disable service or driver.
- ENDLOCAL Stops the localization of the environment changes enabled by the setlocal command.
- ERASE Erase files from computer.
- EXIT Exit from the command interpreter.
- EXPAND Expand a M*cros*ft Windows file back to it's original format.
- EXTRACT Extract files from the M*cros*ft Windows cabinets.
- FASTHELP Displays a listing of MS-DOS commands and information about them.
- FC Compare files.
- FDISK Utility used to create partitions on the hard disk drive.
- FIND Search for text within a file.
- FINDSTR Searches for a string of text within a file.
- FIXBOOT Writes a new boot sector.
- FIXMBR Writes a new boot record to a disk drive.
- FOR Boolean used in batch files.
- FORMAT Command to erase and prepare a disk drive.
- FTP Command to connect and operate on a FTP server.
- FTYPE Displays or modifies file types used in file extension associations.
- GOTO Moves a batch file to a specific label or location.
- GRAFTABL Show extended characters in graphics mode.
- HELP Display a listing of commands and brief explanation.
- IF Allows for batch files to perform conditional processing.
- IFSHLP.SYS 32-bit file manager.
- IPCONFIG Network command to view network adapter settings and assigned values.
- KEYB Change layout of keyboard.
- LABEL Change the label of a disk drive.
- LH Load a device driver in to high memory.
- LISTSVC Recovery console command that displays the services and drivers.
- LOADFIX Load a program above the first 64k.
- LOADHIGH Load a device driver in to high memory.
- LOCK Lock the hard disk drive.
- LOGON Recovery console command to list installations and enable administrator login.
- MAP Displays the device name of a drive.
- MD Command to create a new directory.
- MEM Display memory on system.
- MKDIR Command to create a new directory.
- MODE Modify the port or display settings.
- MORE Display one page at a time.
- MOVE Move one or more files from one directory to another directory.
- MSAV Early M*cros*ft Virus scanner.
- MSD Diagnostics utility.
- MSCDEX Utility used to load and provide access to the CD-ROM.
- NBTSTAT Displays protocol statistics and current TCP/IP connections using NBT
- NET Update, fix, or view the network or network settings
- NETSH Configure dynamic and static network information from MS-DOS.
- NETSTAT Display the TCP/IP network protocol statistics and information.
- NLSFUNC Load country specific information.
- NSLOOKUP Look up an IP address of a domain or host on a network.
- PATH View and modify the computers path location.
- PATHPING View and locate locations of network latency.
- PAUSE Command used in batch files to stop the processing of a command.
- PING Test / send information to another network computer or network device.
- POPD Changes to the directory or network path stored by the pushd command.
- POWER Conserve power with computer portables.
- PRINT Prints data to a printer port.
- PROMPT View and change the MS-DOS prompt.
- PUSHD Stores a directory or network path in memory so it can be returned to at any time.
- QBASIC Open the QBasic.
- RD Removes an empty directory.
- REN Renames a file or directory.
- RENAME Renames a file or directory.
- RMDIR Removes an empty directory.
- ROUTE View and configure windows network route tables.
- RUNAS Enables a user to execute a program on another computer.
- SCANDISK Run the scandisk utility.
- SCANREG Scan registry and recover registry from errors.
- SET Change one variable or string to another.
- SETLOCAL Enables local environments to be changed without affecting anything else.
- SETVER Change MS-DOS version to trick older MS-DOS programs.
- SHARE Installs support for file sharing and locking capabilities.
- SHIFT Changes the position of replaceable parameters in a batch program.
- SHUTDOWN Shutdown the computer from the MS-DOS prompt.
- SMARTDRV Create a disk cache in conventional memory or extended memory.
- SORT Sorts the input and displays the output to the screen.
- START Start a separate window in Windows from the MS-DOS prompt.
- SUBST Substitute a folder on your computer for another drive letter.
- SWITCHES Remove add functions from MS-DOS.
- SYS Transfer system files to disk drive.
- TELNET Telnet to another computer / device from the prompt.
- TIME View or modify the system time.
- TITLE Change the title of their MS-DOS window.
- TRACERT Visually view a network packets route across a network.
- TREE View a visual tree of the hard disk drive.
- TYPE Display the contents of a file.
- UNDELETE Undelete a file that has been deleted.
- UNFORMAT Unformat a hard disk drive.
- UNLOCK Unlock a disk drive.
- VER Display the version information.
- VERIFY Enables or disables the feature to determine if files have been written properly.
- VOL Displays the volume information about the designated drive.
- XCOPY Copy multiple files, directories, and/or drives from one location to another.
- TRUENAME When placed before a file, will display the whole directory in which it exists
- TASKKILL It allows you to kill those unneeded or locked up applications
- ALT+- (ALT+hyphen) Displays the Multiple Document Interface (MDI) child window's System menu
- ALT+ENTER View properties for the selected item
- ALT+ESC Cycle through items in the order they were opened
- ALT+F4 Close the active item, or quit the active program
- ALT+SPACEBAR Display the System menu for the active window
- ALT+TAB Switch between open items
- ALT+Underlined Letter Display the corresponding menu
- BACKSPACE View the folder one level up in My Computer or Windows Explorer
- CTRL+A Select all
- CTRL+B Bold
- CTRL+C Copy
- CTRL+I Italics
- CTRL+O Open an item
- CTRL+U Underline
- CTRL+V Paste
- CTRL+X Cut
- CTRL+Z Undo
- CTRL+F4 Close the active document
- CTRL while dragging Copy selected item
- CTRL+SHIFT while dragging Create shortcut to selected item
- CTRL+RIGHT ARROW Move the insertion point to the beginning of the next word
- CTRL+LEFT ARROW Move the insertion point to the beginning of the previous word
- CTRL+DOWN ARROW Move the insertion point to the beginning of the next paragraph
- CTRL+UP ARROW Move the insertion point to the beginning of the previous paragraph
- SHIFT+DELETE Delete selected item permanently without placing the item in the Recycle Bin
- ESC Cancel the current task
- F1 Displays Help
- F2 Rename selected item
- F3 Search for a file or folder
- F4 Display the Address bar list in My Computer or Windows Explorer
- F5 Refresh the active window
- F6 Cycle through screen elements in a window or on the desktop
- F10 Activate the menu bar in the active program
- SHIFT+F10 Display the shortcut menu for the selected item
- CTRL+ESC Display the Start menu
- SHIFT+CTRL+ESC Launches Task Manager
- SHIFT when you insert a CD Prevent the CD from automatically playing
- WIN Display or hide the Start menu
- WIN+BREAK Display the System Properties dialog box
- WIN+D Minimizes all Windows and shows the Desktop
- WIN+E Open Windows Explorer
- WIN+F Search for a file or folder
- WIN+F+CTRL Search for computers
- WIN+L Locks the desktop
- WIN+M Minimize or restore all windows
- WIN+R Open the Run dialog box
- WIN+TAB Switch between open items
Windows Explorer Shortcuts:
- ALT+SPACEBAR - Display the current window’s system menu
- SHIFT+F10 - Display the item's context menu
- CTRL+ESC - Display the Start menu
- ALT+TAB - Switch to the window you last used
- ALT+F4 - Close the current window or quit
- CTRL+A - Select all items
- CTRL+X - Cut selected item(s)
- CTRL+C - Copy selected item(s)
- CTRL+V - Paste item(s)
- CTRL+Z - Undo last action
- CTRL+(+) - Automatically resize the columns in the right hand pane
- TAB - Move forward through options
- ALT+RIGHT ARROW - Move forward to a previous view
- ALT+LEFT ARROW - Move backward to a previous view
- SHIFT+DELETE - Delete an item immediately
- BACKSPACE - View the folder one level up
- ALT+ENTER - View an item’s properties
- F10 - Activate the menu bar in programs
- F6 - Switch between left and right panes
- F5 - Refresh window contents
- F3 - Display Find application
- F2 - Rename selected item
- CTRL+A - Select all items on the current page
- CTRL+D - Add the current page to your Favorites
- CTRL+E - Open the Search bar
- CTRL+F - Find on this page
- CTRL+H - Open the History bar
- CTRL+I - Open the Favorites bar
- CTRL+N - Open a new window
- CTRL+O - Go to a new location
- CTRL+P - Print the current page or active frame
- CTRL+S - Save the current page
- CTRL+W - Close current browser window
- CTRL+ENTER - Adds the http://www. (url) .com
- SHIFT+CLICK - Open link in new window
- BACKSPACE - Go to the previous page
- ALT+HOME - Go to your Home page
- HOME - Move to the beginning of a document
- TAB - Move forward through items on a page
- END - Move to the end of a document
- ESC - Stop downloading a page
- F11 - Toggle full-screen view
- F5 - Refresh the current page
- F4 - Display list of typed addresses
- F6 - Change Address bar and page focus
- ALT+RIGHT ARROW - Go to the next page
- SHIFT+CTRL+TAB - Move back between frames
- SHIFT+F10 - Display a shortcut menu for a link
- SHIFT+TAB - Move back through the items on a page
- CTRL+TAB - Move forward between frames
- F1 - Display Internet Explorer Help
23 Ways To Speed WinXP - Not only Defrag
Since defragging the disk won't do much to improve Windows XP performance, here are 23 suggestions that will. Each can enhance the performance and reliability of your customers' PCs. Best of all, most of them will cost you nothing.
- To decrease a system's boot time and increase system performance, use the money you save by not buying defragmentation software -- the built-in Windows defragmenter works just fine -- and instead equip the computer with an Ultra-133 or Serial ATA hard drive with 8-MB cache buffer.
- If a PC has less than 512 MB of RAM, add more memory. This is a relatively inexpensive and easy upgrade that can dramatically improve system performance.
- Ensure that Windows XP is utilizing the NTFS file system. If you're not sure, here's how to check: First, double-click the My Computer icon, right-click on the C: Drive, then select Properties. Next, examine the File System type; if it says FAT32, then back-up any important data. Next, click Start, click Run, type CMD, and then click OK. At the prompt, type CONVERT C: /FS:NTFS and press the Enter key. This process may take a while; it's important that the computer be uninterrupted and virus-free. The file system used by the bootable drive will be either FAT32 or NTFS. I highly recommend NTFS for its superior security, reliability, and efficiency with larger disk drives.
- Disable file indexing. The indexing service extracts information from documents and other files on the hard drive and creates a "searchable keyword index." As you can imagine, this process can be quite taxing on any system.
The idea is that the user can search for a word, phrase, or property inside a document, should they have hundreds or thousands of documents and not know the file name of the document they want. Windows XP's built-in search functionality can still perform these kinds of searches without the Indexing service. It just takes longer. The OS has to open each file at the time of the request to help find what the user is looking for.
Most people never need this feature of search. Those who do are typically in a large corporate environment where thousands of documents are located on at least one server. But if you're a typical system builder, most of your clients are small and medium businesses. And if your clients have no need for this search feature, I recommend disabling it.
Here's how: First, double-click the My Computer icon. Next, right-click on the C: Drive, then select Properties. Uncheck "Allow Indexing Service to index this disk for fast file searching." Next, apply changes to "C: subfolders and files," and click OK. If a warning or error message appears (such as "Access is denied"), click the Ignore All button. - Update the PC's video and motherboard chipset drivers. Also, update and configure the BIOS. For more information on how to configure your BIOS properly, see this article on my site.
- Empty the Windows Prefetch folder every three months or so. Windows XP can "prefetch" portions of data and applications that are used frequently. This makes processes appear to load faster when called upon by the user. That's fine. But over time, the prefetch folder may become overloaded with references to files and applications no longer in use. When that happens, Windows XP is wasting time, and slowing system performance, by pre-loading them. Nothing critical is in this folder, and the entire contents are safe to delete.
- Once a month, run a disk cleanup. Here's how: Double-click the My Computer icon. Then right-click on the C: drive and select Properties. Click the Disk Cleanup button -- it's just to the right of the Capacity pie graph -- and delete all temporary files.
- In your Device Manager, double-click on the IDE ATA/ATAPI Controllers device, and ensure that DMA is enabled for each drive you have connected to the Primary and Secondary controller. Do this by double-clicking on Primary IDE Channel. Then click the Advanced Settings tab. Ensure the Transfer Mode is set to "DMA if available" for both Device 0 and Device 1. Then repeat this process with the Secondary IDE Channel.
- Upgrade the cabling. As hard-drive technology improves, the cabling requirements to achieve these performance boosts have become more stringent. Be sure to use 80-wire Ultra-133 cables on all of your IDE devices with the connectors properly assigned to the matching Master/Slave/Motherboard sockets. A single device must be at the end of the cable; connecting a single drive to the middle connector on a ribbon cable will cause signaling problems. With Ultra DMA hard drives, these signaling problems will prevent the drive from performing at its maximum potential. Also, because these cables inherently support "cable select," the location of each drive on the cable is important. For these reasons, the cable is designed so drive positioning is explicitly clear.
- Remove all spyware from the computer. Use free programs such as AdAware by Lavasoft or SpyBot Search & Destroy. Once these programs are installed, be sure to check for and download any updates before starting your search. Anything either program finds can be safely removed. Any free software that requires spyware to run will no longer function once the spyware portion has been removed; if your customer really wants the program even though it contains spyware, simply reinstall it. For more information on removing Spyware visit this Web Pro News page.
- Remove any unnecessary programs and/or items from Windows Startup routine using the MSCONFIG utility. Here's how: First, click Start, click Run, type MSCONFIG, and click OK. Click the StartUp tab, then uncheck any items you don't want to start when Windows starts. Unsure what some items are? Visit the WinTasks Process Library. It contains known system processes, applications, as well as spyware references and explanations. Or quickly identify them by searching for the filenames using Google or another Web search engine.
- Remove any unnecessary or unused programs from the Add/Remove Programs section of the Control Panel.
- Turn off any and all unnecessary animations, and disable active desktop. In fact, for optimal performance, turn off all animations. Windows XP offers many different settings in this area. Here's how to do it: First click on the System icon in the Control Panel. Next, click on the Advanced tab. Select the Settings button located under Performance. Feel free to play around with the options offered here, as nothing you can change will alter the reliability of the computer -- only its responsiveness.
- If your customer is an advanced user who is comfortable editing their registry, try some of the performance registry tweaks offered at Tweak XP.
- Visit Microsoft's Windows update site regularly, and download all updates labeled Critical. Download any optional updates at your discretion.
- Update the customer's anti-virus software on a weekly, even daily, basis. Make sure they have only one anti-virus software package installed. Mixing anti-virus software is a sure way to spell disaster for performance and reliability.
- Make sure the customer has fewer than 500 type fonts installed on their computer. The more fonts they have, the slower the system will become. While Windows XP handles fonts much more efficiently than did the previous versions of Windows, too many fonts -- that is, anything over 500 -- will noticeably tax the system.
- Do not partition the hard drive. Windows XP's NTFS file system runs more efficiently on one large partition. The data is no safer on a separate partition, and a reformat is never necessary to reinstall an operating system. The same excuses people offer for using partitions apply to using a folder instead. For example, instead of putting all your data on the D: drive, put it in a folder called "D drive." You'll achieve the same organizational benefits that a separate partition offers, but without the degradation in system performance. Also, your free space won't be limited by the size of the partition; instead, it will be limited by the size of the entire hard drive. This means you won't need to resize any partitions, ever. That task can be time-consuming and also can result in lost data.
- Check the system's RAM to ensure it is operating properly. I recommend using a free program called MemTest86. The download will make a bootable CD or diskette (your choice), which will run 10 extensive tests on the PC's memory automatically after you boot to the disk you created. Allow all tests to run until at least three passes of the 10 tests are completed. If the program encounters any errors, turn off and unplug the computer, remove a stick of memory (assuming you have more than one), and run the test again. Remember, bad memory cannot be repaired, but only replaced.
- If the PC has a CD or DVD recorder, check the drive manufacturer's Web site for updated firmware. In some cases you'll be able to upgrade the recorder to a faster speed. Best of all, it's free.
- Disable unnecessary services. Windows XP loads a lot of services that your customer most likely does not need. To determine which services you can disable for your client, visit the Black Viper site for Windows XP configurations.
- If you're sick of a single Windows Explorer window crashing and then taking the rest of your OS down with it, then follow this tip: open My Computer, click on Tools, then Folder Options. Now click on the View tab. Scroll down to "Launch folder windows in a separate process," and enable this option. You'll have to reboot your machine for this option to take effect.
- At least once a year, open the computer's cases and blow out all the dust and debris. While you're in there, check that all the fans are turning properly. Also inspect the motherboard capacitors for bulging or leaks. For more information on this leaking-capacitor phenomena, you can read numerous articles on my site.
Windows XP STEP - 4
Windows XP STEP - 4
The GUI-based portion of the Setup program
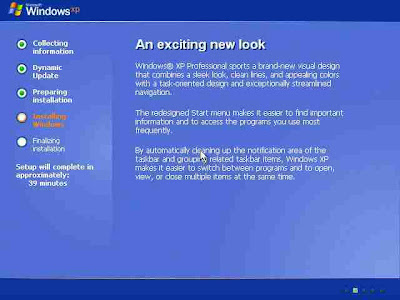
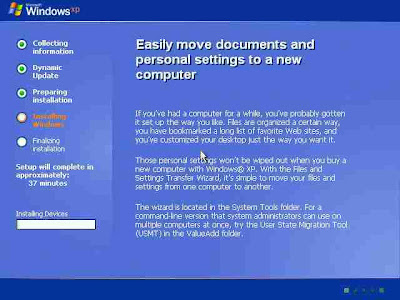
Click Customize to change regional settings, if necessary.
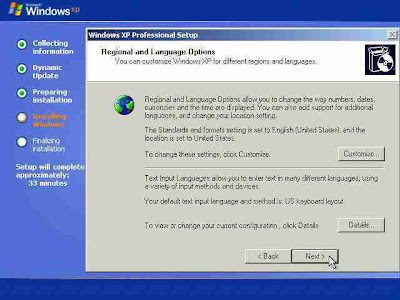

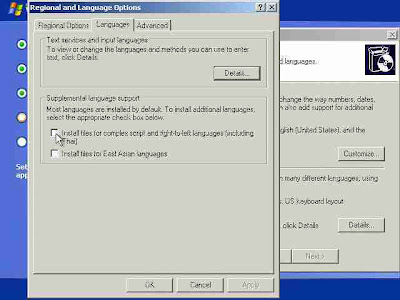
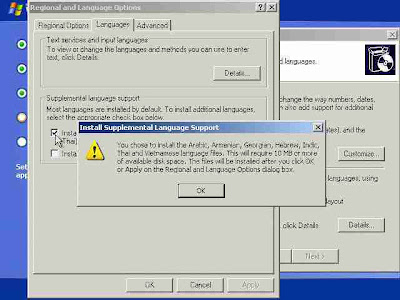
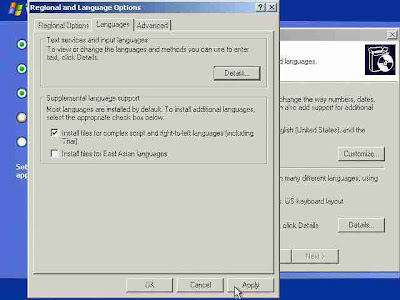
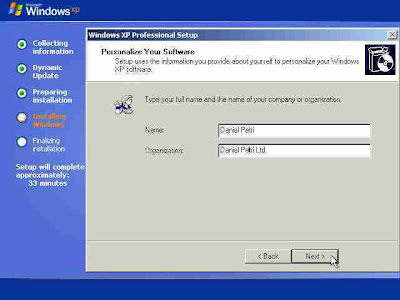
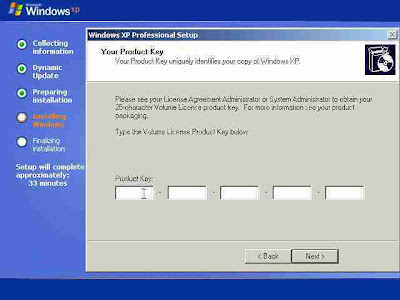

After a few seconds you will receive the Networking Settings window. BTW, if you have a NIC that is not in the HCL (see the What's the HCL? page) and XP cannot detect it, or if you don't have a NIC at all, setup will skip this step and you will immediately go to the final phase of the setup process.
Press Next to accept the Typical settings option if you have one of the following situations:

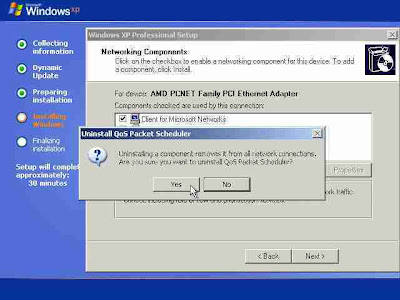
 In the General tab enter the required information. You must specify the IP address of the computer, and if you don't know what the Subnet Mask entry should be - you can simply place your mouse pointer over the empty area in the Subnet Mask box and click it. The OS will automatically select the value it thinks is good for the IP address you provided.
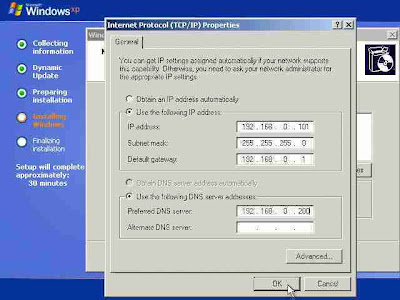
If you don't know what these values mean, or if you don't know what to write in them, press cancel and select the Typical Settings option. You can easily change these values later.
In the Workgroup or Domain window enter the name of your workgroup or domain.
If you're a stand-alone computer, or if you don't know what to enter, or if you don't have the sufficient rights to join a domain - leave the default entry selected and press Next.
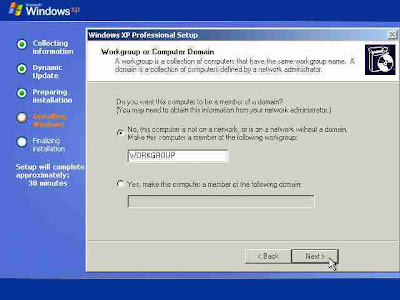
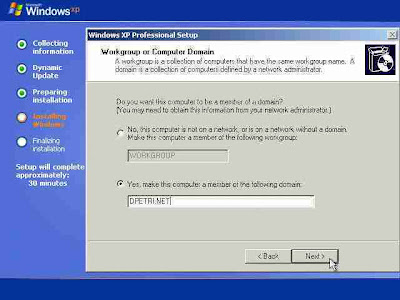
To successfully join a domain you need the following:
The person performing the installation must have a user account in Active Directory. This account does not need to be the domain Administrator account.
and
The computer must have an existing computer account in the Active Directory database of the domain that the computer is joining, and the computer must be named exactly as its domain account is named.
or
The person performing the installation must have appropriate permission to create a domain account for the computer during installation.
Also, you need to have connectivity to the domain's domain controllers (only to the PDC if on an NT 4.0 domain) and a fully functional DNS server (only in AD domains). Read the Joining a Domain in Windows XP Pro and Requirements when Joining a Domain pages for more on this issue.
Enter the Active Directory domain name (in the form of xxx.yyy, for example: DPETRI.NET) or the NetBIOS name of the NT 4.0 domain (in the form of xxx, for example: DPETRI). Press Next.
Note: If you provide a wrong domain name or do not have the correct connectivity to the domain's DNS server you will get an error message.
A username/password window will appear. Enter the name and password of the domain's administrator (or your own if you're the administrator on the target domain).
After the copying and configuring phase is finished, if XP finds that you have a badly configured screen resolution it will advise you to change it and ask you if you see the new settings right.
 You will be asked to register your copy of XP. You can decline if you want.
XP will ask you for the default username that will log onto this computer. You can enter as many as 5 users, but you can create more after the installation is finished.
BTW, the Administrator is not shown as a valid logon option (read more about it on the Add the Administrator's Account to the Welcome Screen in XP Pro page).
<
The GUI-based portion of the Setup program
- The setup process reboots and loads a GUI mode phase.


- It will then begin to load device drivers based upon what it finds on your computer. You don't need to do anything at this stage.

Click Customize to change regional settings, if necessary.
- Current System Locale - Affects how programs display dates, times, currency, and numbers. Choose the locale that matches your location, for example, French (Canada).
- Current Keyboard Layout - Accommodates the special characters and symbols used in different languages. Your keyboard layout determines which characters appear when you press keys on the keyboard.
- If you don't need to make any changes just press Next.

- If you do need to make changes press Customize and add your System Locale etc.

- Note for Hebrew users: Unlike W2K, it is SAFE and it is OK for you to install Hebrew language support at this phase.
- After pressing Customize go to the Languages tab and select the "Install files for complex script and right-to-left languages".

- A warning message will appear. Press Ok.

- Warning: You must now press Apply!

- Setup will copy the necessary files from the installation point

- You can now go to the Regional Options tab and select Israel in the Location drop-down list, and Hebrew in the Standards and Formats drop-down list. Click Ok.

- Type your name and organization.

- Type the product key.

- Type the computer name and a password for the local Administrator account. The local Administrator account resides in the SAM of the computer, not in Active Directory. If you will be installing in a domain, you need either a pre-assigned computer name for which a domain account has been created, or the right to create a computer account within the domain.

- Select the date, time, and time zone settings.

- Setup will now install the networking components.

After a few seconds you will receive the Networking Settings window. BTW, if you have a NIC that is not in the HCL (see the What's the HCL? page) and XP cannot detect it, or if you don't have a NIC at all, setup will skip this step and you will immediately go to the final phase of the setup process.
Press Next to accept the Typical settings option if you have one of the following situations:
- You have a functional DHCP on your network.
- You have a computer running Internet Connection Sharing (ICS).
- You're in a workgroup environment and do not plan to have any other servers or Active Directory at all, and all other workgroup members are configured in the same manner.

- Otherwise select Custom Settings and press Next to customize your network settings.

- One thing you CAN do (you don't have to do it, it's your call - read more about it on the Increase Internet Connection Speed in Windows XP page) is to uninstall the Qos Packet Scheduler. Click it and press the Uninstall button. If you want to keep it you can simply remove the mark from the QoS check-box. In anyway you can later install or uninstall it if you want.


- Keep the TCP/IP, Client for Microsoft Networks and the File and Print Sharing options selected.
- Highlight the TCP/IP selection and press Properties.
 In the General tab enter the required information. You must specify the IP address of the computer, and if you don't know what the Subnet Mask entry should be - you can simply place your mouse pointer over the empty area in the Subnet Mask box and click it. The OS will automatically select the value it thinks is good for the IP address you provided.
If you don't know what these values mean, or if you don't know what to write in them, press cancel and select the Typical Settings option. You can easily change these values later.
In the Workgroup or Domain window enter the name of your workgroup or domain.
- workgroup is a small group of computers on a network that enables users to work together and does not support centralized administration.
- A domain is a logical grouping of computers on a network that has a central security database for storing security information. Centralized security and administration are important for computers in a domain because they enable an administrator to easily manage computers that are geographically distant from each other. A domain is administered as a unit with common rules and procedures. Each domain has a unique name, and each computer within a domain has a unique name.
If you're a stand-alone computer, or if you don't know what to enter, or if you don't have the sufficient rights to join a domain - leave the default entry selected and press Next.

- If you want to join a domain (NT 4.0 domain of W2K/2003 Active Directory domain) enter the domain's name in the "Yes, make this computer a member of the following domain" box.

To successfully join a domain you need the following:
The person performing the installation must have a user account in Active Directory. This account does not need to be the domain Administrator account.
and
The computer must have an existing computer account in the Active Directory database of the domain that the computer is joining, and the computer must be named exactly as its domain account is named.
or
The person performing the installation must have appropriate permission to create a domain account for the computer during installation.
Also, you need to have connectivity to the domain's domain controllers (only to the PDC if on an NT 4.0 domain) and a fully functional DNS server (only in AD domains). Read the Joining a Domain in Windows XP Pro and Requirements when Joining a Domain pages for more on this issue.
Enter the Active Directory domain name (in the form of xxx.yyy, for example: DPETRI.NET) or the NetBIOS name of the NT 4.0 domain (in the form of xxx, for example: DPETRI). Press Next.
Note: If you provide a wrong domain name or do not have the correct connectivity to the domain's DNS server you will get an error message.
A username/password window will appear. Enter the name and password of the domain's administrator (or your own if you're the administrator on the target domain).

- Note: Providing a wrong user name or password will cause this phase to fail.
- Next the setup process will finish copying files and configuring the setup. You do not need to do anything.


After the copying and configuring phase is finished, if XP finds that you have a badly configured screen resolution it will advise you to change it and ask you if you see the new settings right.


- Setup finishes and boots Windows XP.
- A Welcome screen is the first thing you see. The computer checks your Internet connectivity (required for the mandatory Activation and voluntary Registration processes).


 You will be asked to register your copy of XP. You can decline if you want.
XP will ask you for the default username that will log onto this computer. You can enter as many as 5 users, but you can create more after the installation is finished.
BTW, the Administrator is not shown as a valid logon option (read more about it on the Add the Administrator's Account to the Welcome Screen in XP Pro page).


- That's it... You're installed

<
Subscribe to:
Posts (Atom)